|
Note: Please note that the “Incoming Webhook” option has been renamed to “3rd Party Event”. Thus, the option from your Thrive Ultimatum Dashboard will differ from the one shown in the video tutorial. However, please keep in mind that its functionality remained the same. |
Thrive Ultimatum allows you to set the “Incoming Webhook” trigger type when choosing the trigger that should start your evergreen campaign.
You can read more about this trigger type and Incoming Webhooks in this article, if you need more information, or if you just want to see which autoresponders can be used while setting up this option.
Basically, this option can be used if you want to trigger a Thrive Ultimatum campaign at a very specific moment. This way, you can very easily create marketing or sales funnels. You can learn more about Incoming Webhooks here.
The way this works is by setting up a Thrive Ultimatum campaign, in which you will have to set some options, and then creating a workflow in Drip. The workflow can be customized in various ways. Thus, the Thrive Ultimatum evergreen campaign can be triggered at a certain point, when the workflow is running.
If you want to use the option alongside a Drip workflow, keep reading this article, as we’ll go through the entire process step by step.
|
As an example, let’s create a simple funnel. When someone signs up on my site, using a form (that we’ll connect to our Drip account), they will be sent a “Welcome” email. After a while (1-2 days, for example), they can receive another email presenting our business and providing details about a specific topic. If the users are interested in the second email and open it, we can set this as the action that will trigger the webhook and start the Thrive Ultimatum campaign. At that moment, we know that the user is interested in the topic presented in the second email, so we can offer them a free item or a discount, but they have a limited time to redeem it. |
In order to properly set up the entire flow, we will first have to create or edit a Thrive Ultimatum campaign and make the necessary settings. Then, we can create our Drip workflow and, lastly, set up the “Lead Generation” element from Thrive Architect.
Here is how to do all that:
Set Up the Thrive Ultimatum Evergreen Campaign
Firstly, you will need to create an Evergreen campaign or edit an existing one. Please follow this step-by-step article if you need help configuring an Evergreen campaign from scratch.
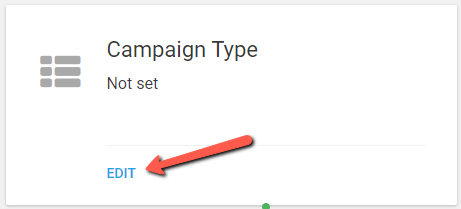
Once you have the campaign, you will have to choose its type. Click on “Edit”, to do that:
Choose the “Evergreen Campaign” type:

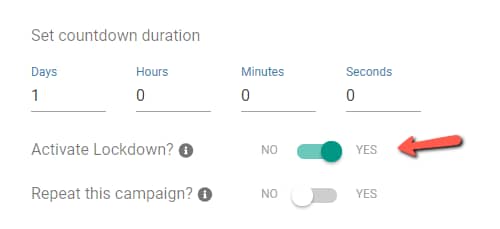
Next, set up the campaign duration, and then make sure that you switch on the “Activate Lockdown” option:
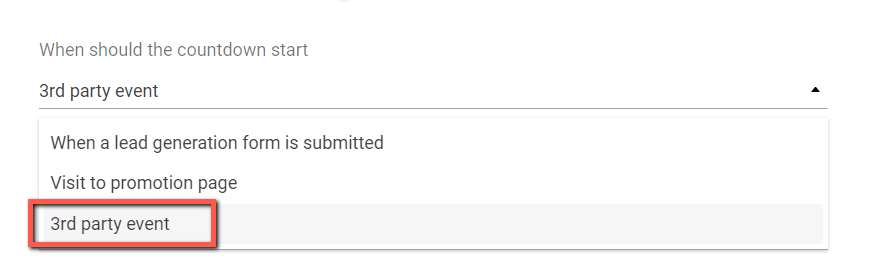
Then, you will see the three available trigger types. Click on “3rd Party Event”, to get started:
Just as the info note below the option says, using a webhook will start the campaign when an incoming webhook is received from a third party platform (an autoresponder for example).
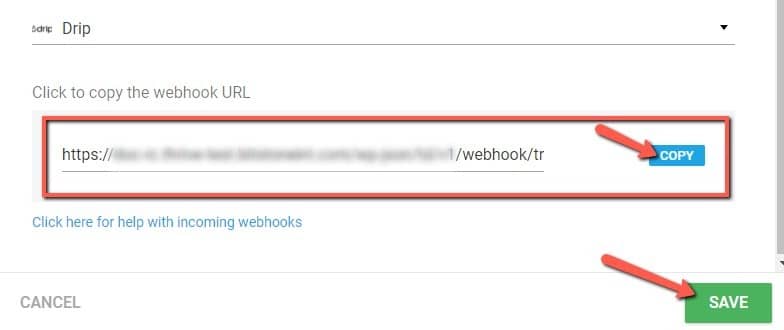
You will have to choose the autoresponder from the next field. In this case, click on “Drip Webhook”:

You will then be able to copy the URL of the webhook, which you will be able to see here. Make sure you save everything by clicking on the green “Save” button:
You can continue setting up the Display Options for the campaign.
Choose the Lockdown Settings
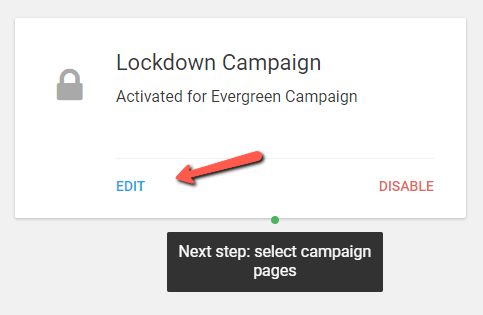
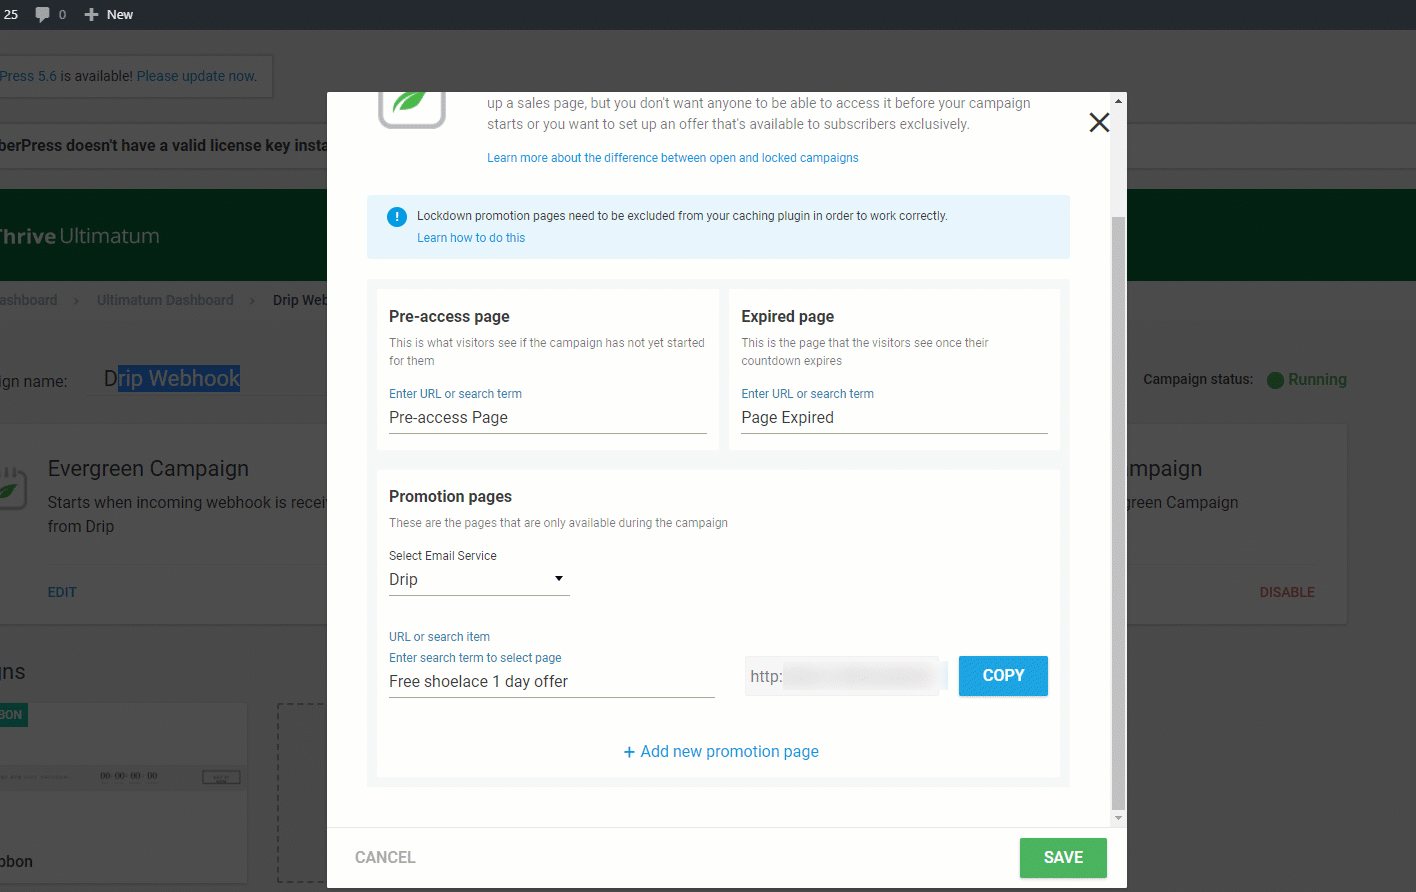
In order for the campaign to properly work, you will need to choose the Lockdown Campaign “Promotion”/”Pre-access”/”Expired” pages.
For that, click on “Edit” in the “Lockdown Campaign” card:
First of all, choose the “Pre-access” and ”Expired” pages:
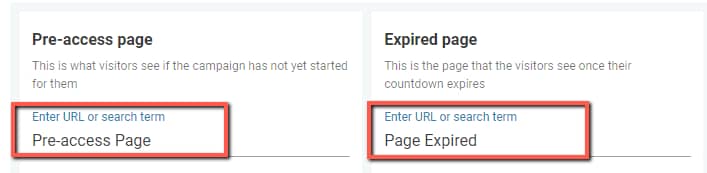
If you need more information, you can read more about these pages here.
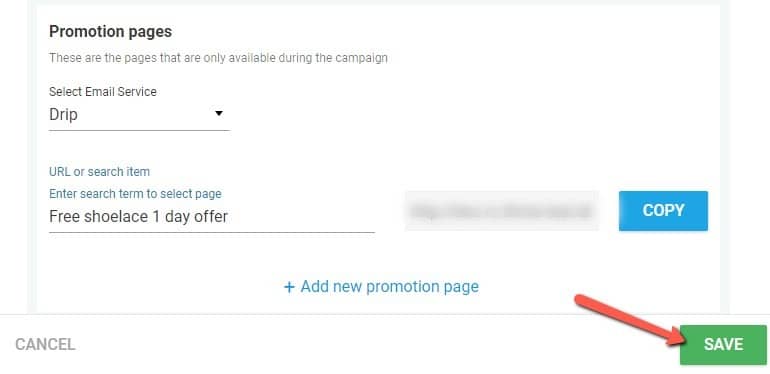
Then, in the “Promotion Pages” section, choose the email service, in this case, we will have to select “Drip”:

Next, add the promotion page that you want:
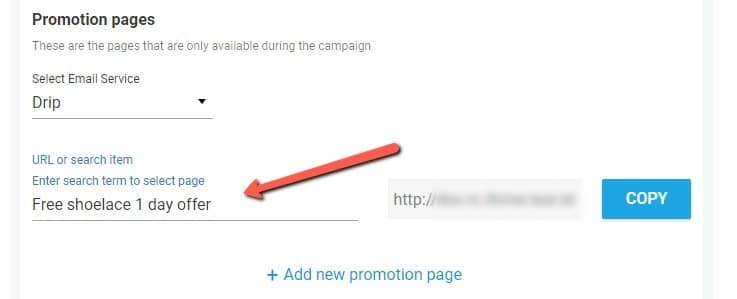
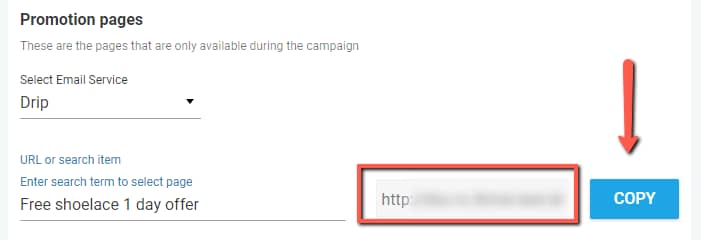
Once you add the promotion page, a link will be generated right next to the field. This is the link that you will have to insert into the email that you send to your customers. We will come back in a bit and copy this link:
Save everything to close this pop-up:
|
Important! Make sure that the campaign is running, and not paused.  |
Everything is done here, we have the webhook link and the URL of the promotion page. We can now head to the Drip website, log in to our account, and set up the workflow.
For that, you’ll have to clearly know what the purpose of this workflow is, and what actions/triggers you want to add.
For example, let’s create a funnel for the new subscribers of our website. Each time someone subscribes, the workflow starts and they get a “Welcome” email. After 2 days, they will receive another email, with detailed information about a certain topic.
If they open the second email, this will let us know that we’ve got their interest. The webhook will be triggered, so the Thrive Ultimatum campaign will start.
They will get another email, letting them know that they’ve got a limited time offer, which will be linked to the promotion page, previously set from the Thrive Ultimatum lockdown settings.
Here’s how to set this up:
Create the Workflow in Drip
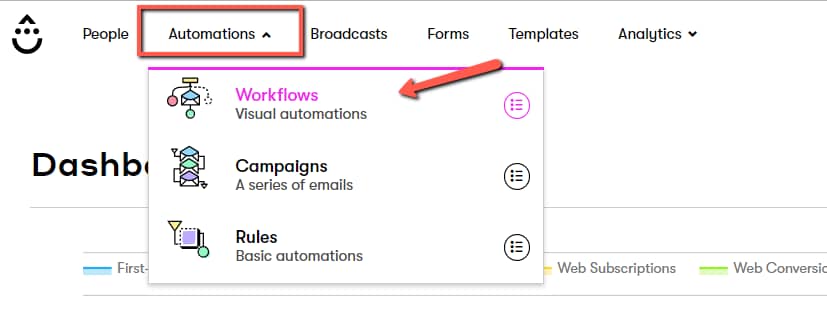
Access your Drip account and, from the top side of your dashboard, click on “Automations” and choose “Workflows” from the dropdown that opens:
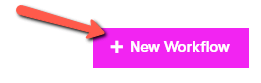
This is where you can create the workflow from. To create a new one, click on “+New Workflow”:
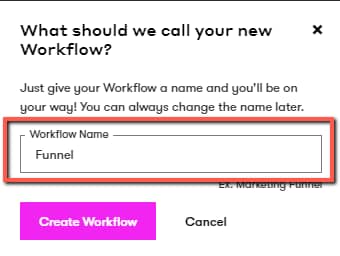
A pop-up will open, and you can name the workflow as you wish, and then click on “Create Workflow”:
Once you do that, you can start working on your workflow.
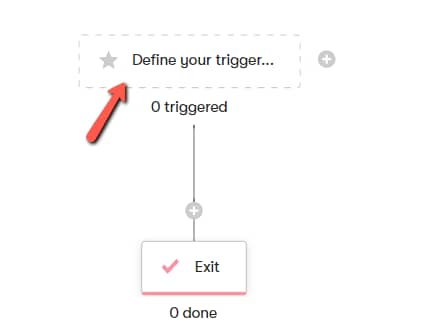
Add a Start Trigger
The first step is to set a start trigger. To add one, click on the “Define your trigger” section of the workflow:
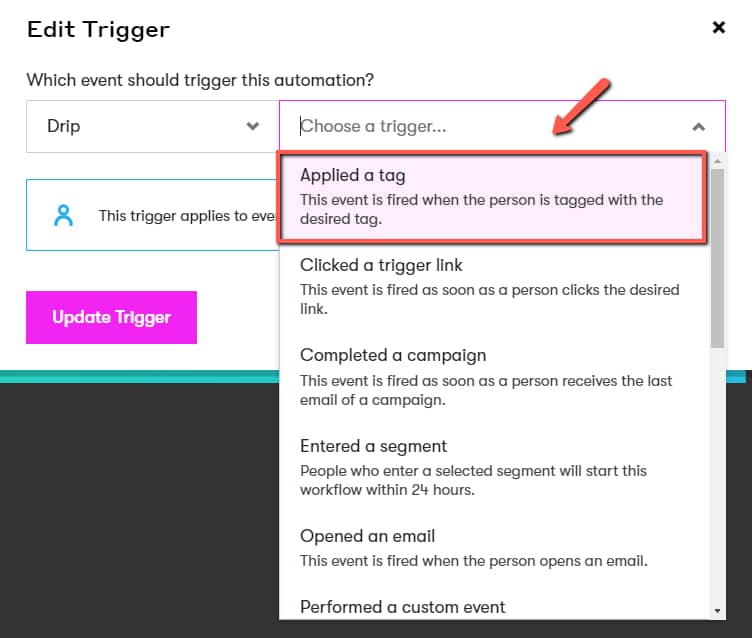
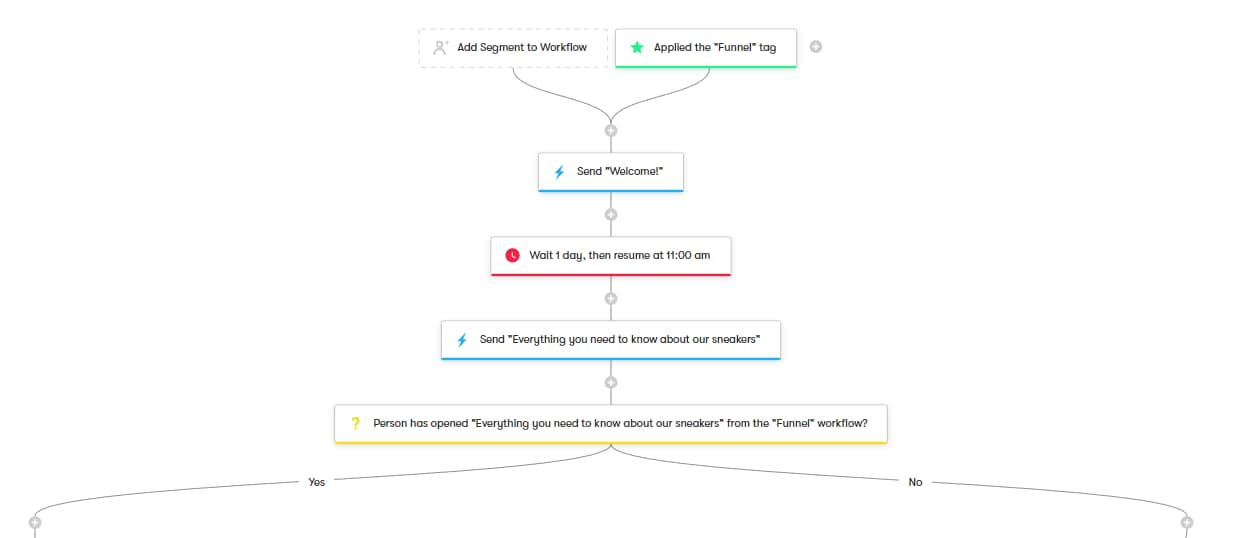
I want the entire process to start after someone signs up on my site, using a form that has a certain tag added to it. This is why I will set the start trigger to be “Applied a tag”:
Enter your tag in the dedicated field:
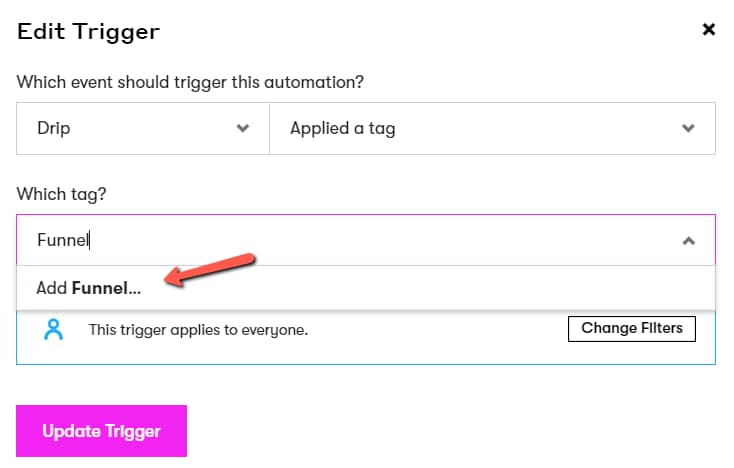
Click on “Update Trigger”:

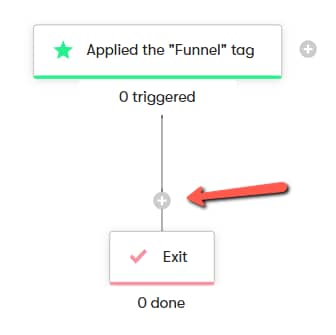
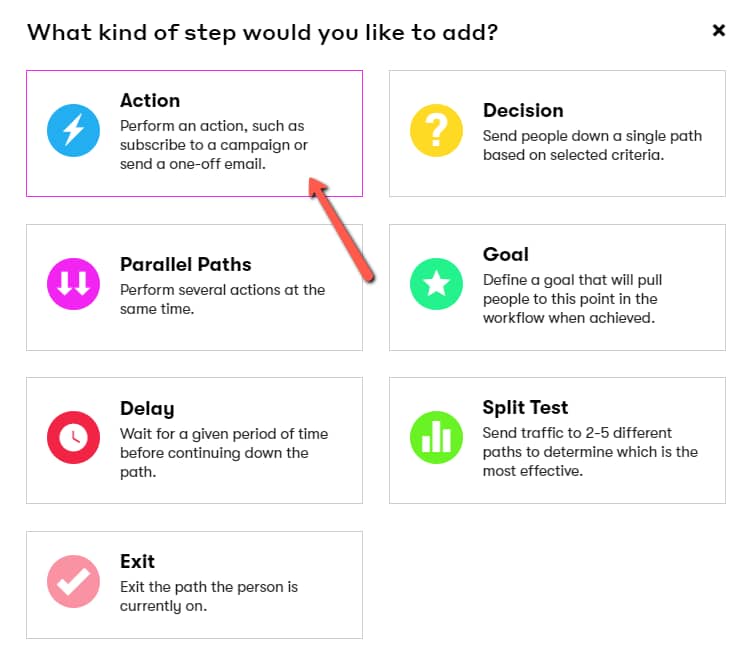
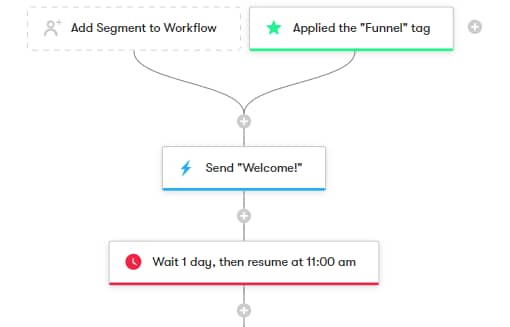
The start trigger has been set. Next, the “Welcome” email should be sent. For this, I will add a new action, by clicking on the plus sign:
Add a New Action – “Send an email”
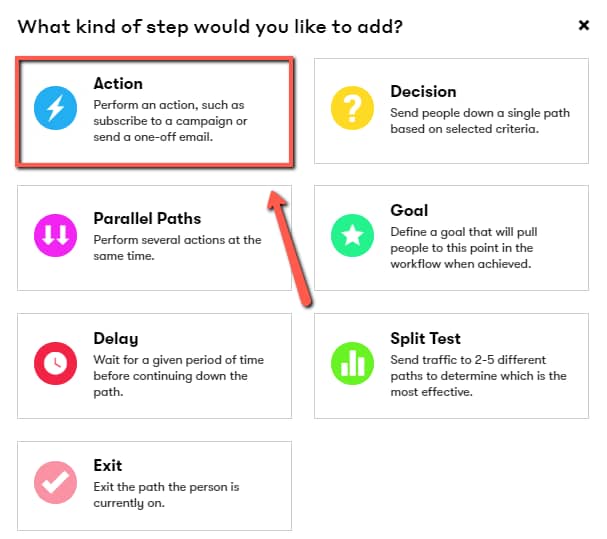
After clicking on the plus sign, a pop-up will open. If you want to send an email, click on the “Action” card:
Click on the “Choose an action” field and select the “Send a one-off email” option:
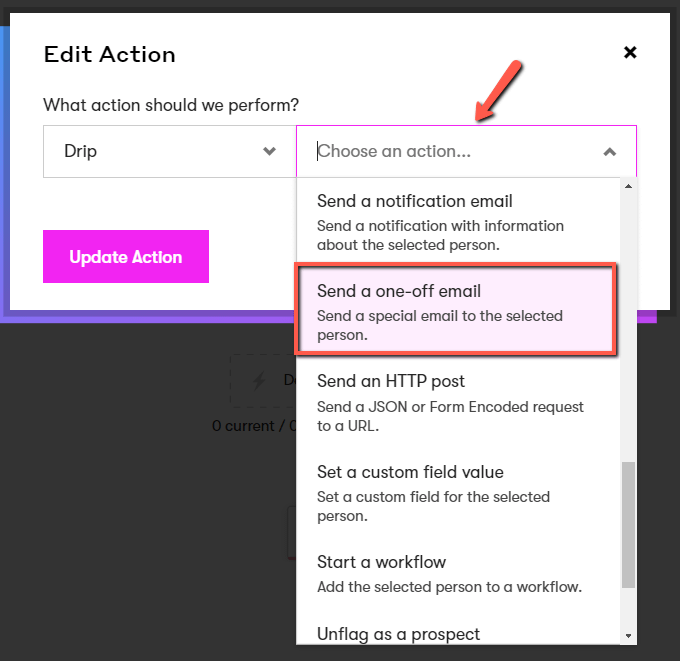
You can then configure the email as you wish. Click on “Update Action” when you’re done editing or creating the email.
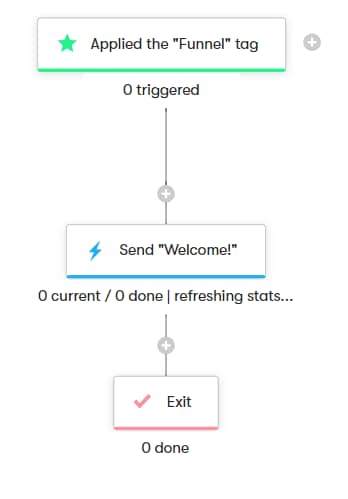
So far, the workflow should look something like this:
Add a New Step – “Delay”
If you want some time to pass between emails, you can add a “Delay”. Click on a plus sign from the workflow (depending on where you want the delay to be added), and choose the “Delay” card from the pop-up:
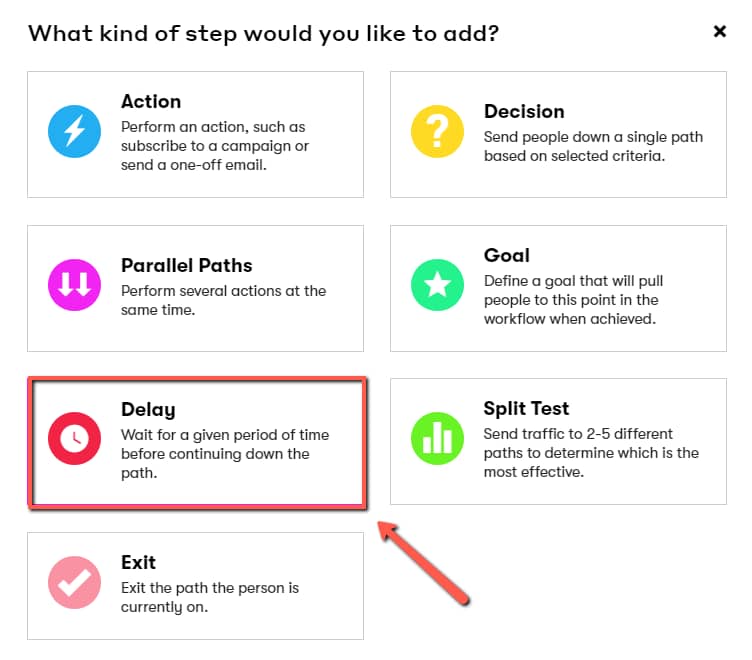
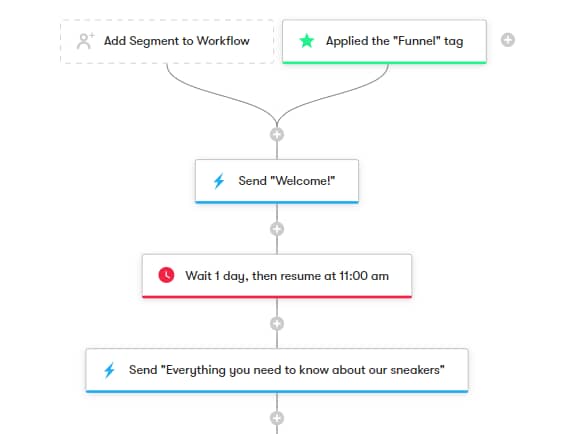
Set up the delay as you wish, and the workflow should look like this:
Add a New Action – “Send a one-off email”
In my example, I’ve said that I want to send out a second email, with more in-depth information about a certain topic.
If my subscribers are interested in that topic and open the second email, the webhook will be triggered.
For this reason, I will create one more step in the workflow:
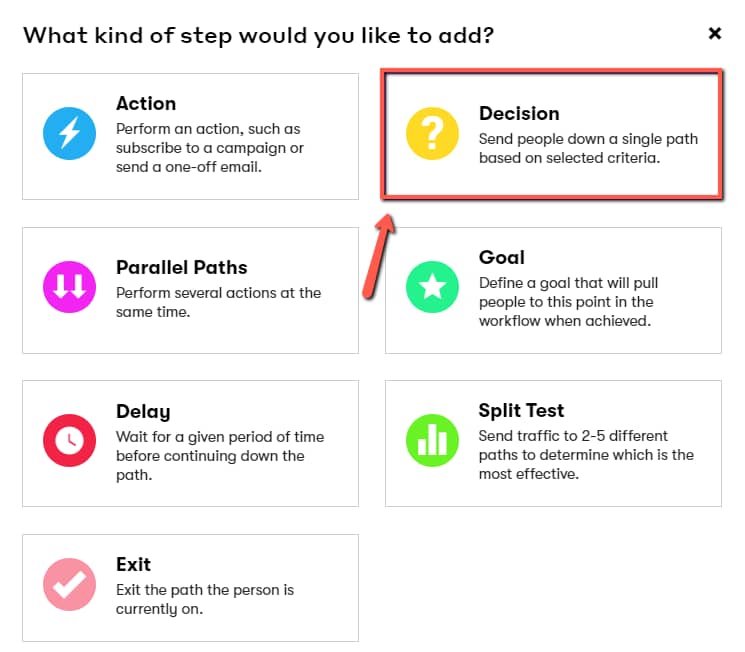
Add a New Step – “Decision”
Now, as I’ve previously stated, I want the next email to be sent only to the subscribers that have opened the previous email.
For this reason, I will add a “Decision”, which is basically an “if/else” structure. If the user performs a certain event, the workflow will continue down one path. If the user does not perform that event, the workflow will continue down the other path.
To do that, click on the next plus sign from your workflow, and click on “Decision” from the pop-up:
The workflow will split into two paths. You can customize one or both of the paths.
Here is the rule that I will set:
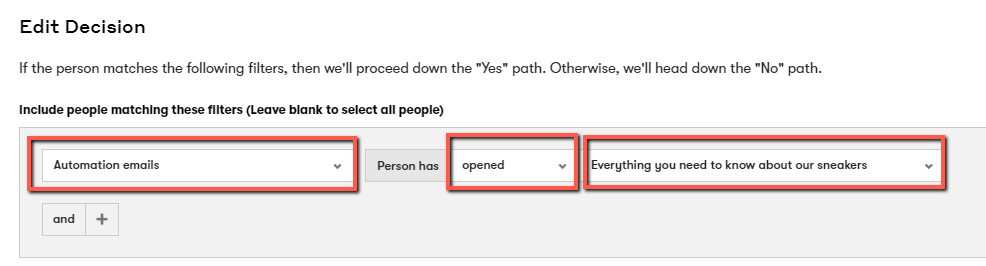
- “Include people based on “Automation Emails “:
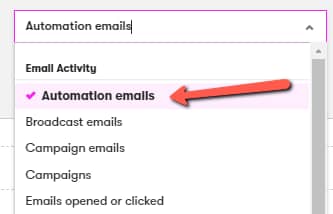
- “Person has opened”:
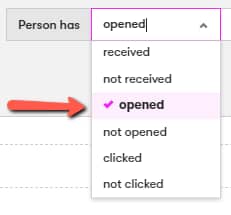
- choose the email that, if opened, will trigger the campaign:

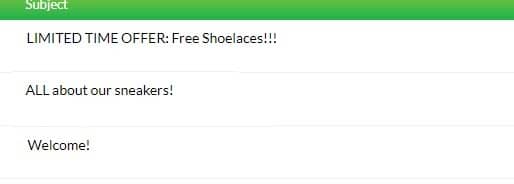
Thus. if someone opens the “Everything you need to know about sneakers”
email, the next action can be performed.
|
Note: Upon further testing, it seems like some of the options that can be used when setting up the decision may not trigger the webhook. If you find yourself encountering problems, please contact Drip Support, and let them know about your issue. |
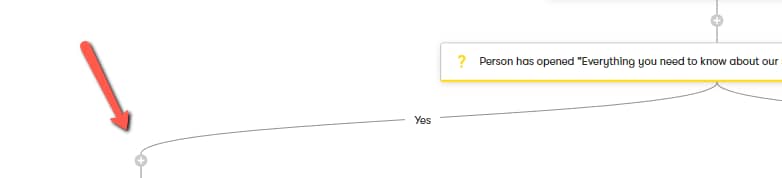
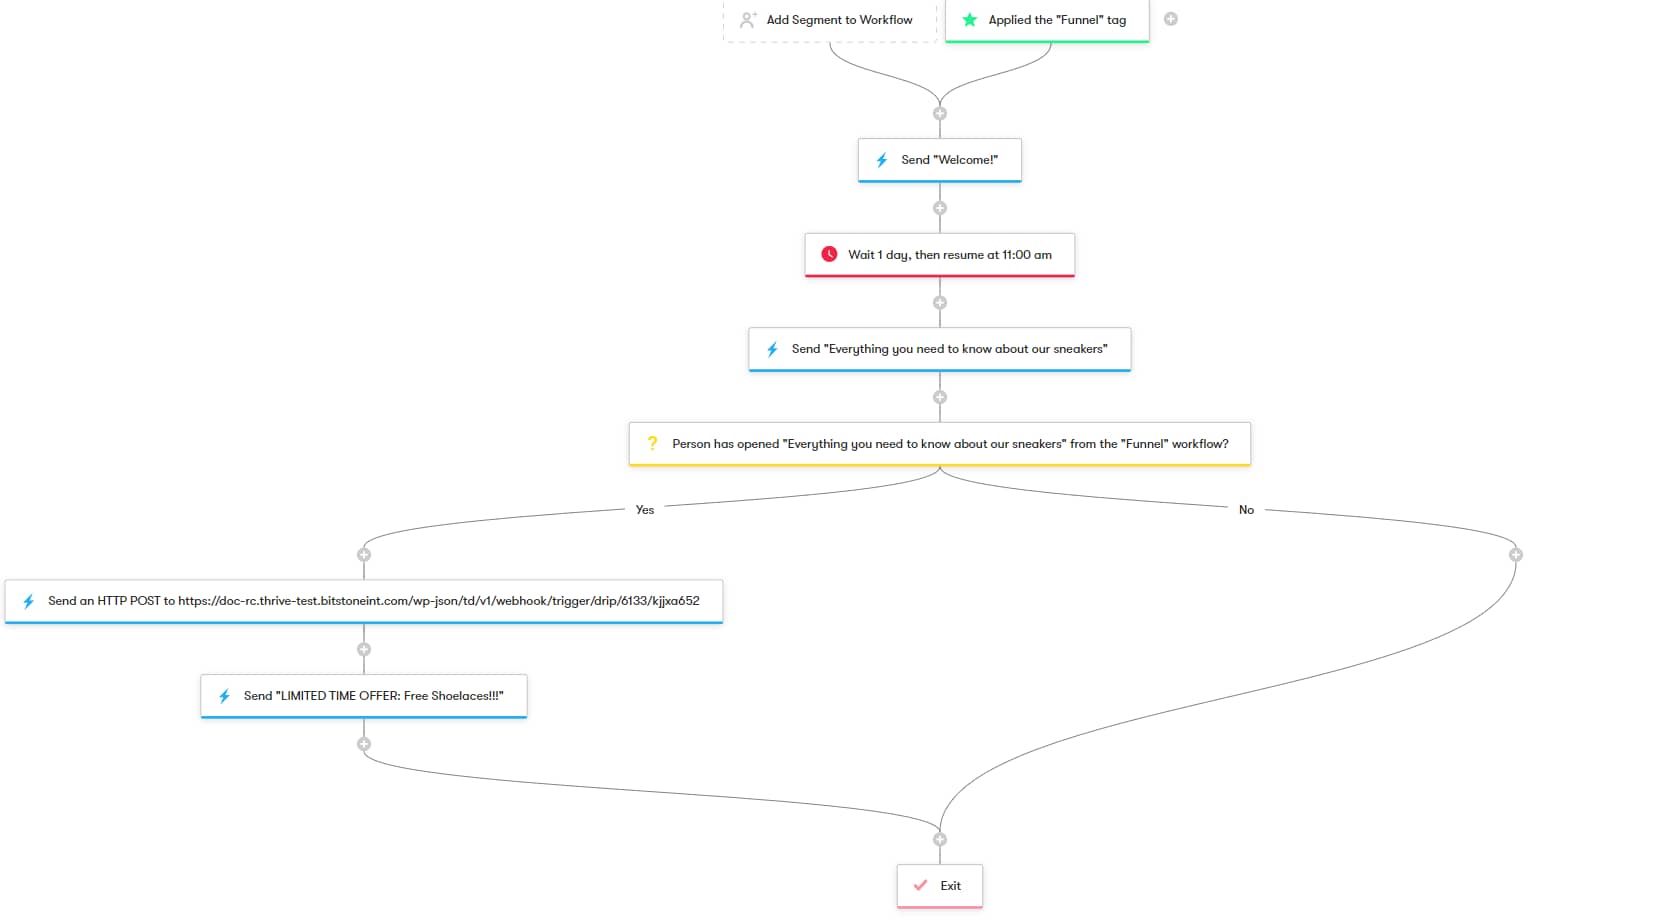
As you will notice, the “Decision” will split the workflow into two different paths:
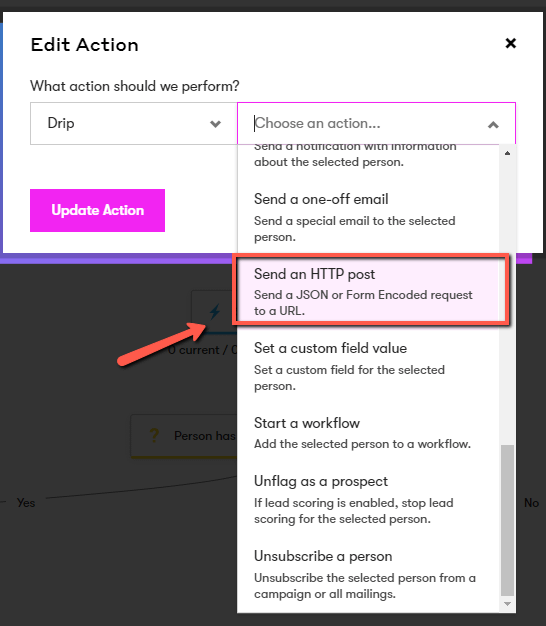
Add a New Action – “Send an HTTP Post”
To continue the workflow, we’ll work with the “Yes” branch of the condition, and this is where the webhook will be triggered. Click on the plus sign below “Yes”:
Click on “Action”:
Then, select the “Send an HTTP post” option (you can read more about HTTP Post here):
Add the webhook URL generated in Thrive Ultimatum in the “Endpoint URL” field of this pop-up:
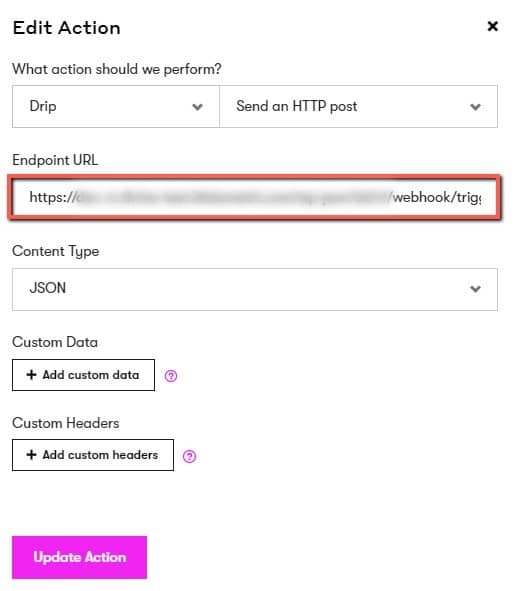
Choose the “JSON” or “Form-Encoded” content type from the next field:
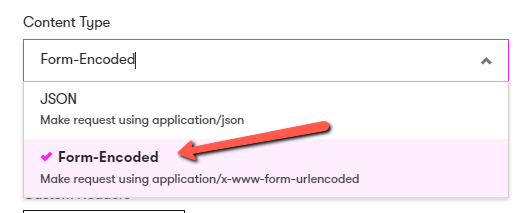
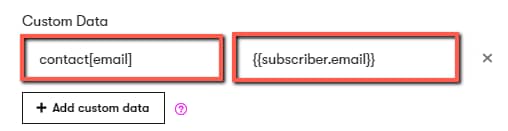
In this case, I’ve chosen the second option. I have also inserted custom data, by clicking on “Add custom data” and adding the “contact[email]” name, and “#{{subscriber.email}}” as a value, as shown here:
To finish and add the action, click on “Update Action”.
Add a New Action – “Send a one-off email”
We’ve reached the last action to be added to the workflow – the email with the promotion page.
In the last step of the automation, we’ve triggered the webhook. To follow my example, we need to send one more email to the subscribers that have reached this point.
This email should contain the link to the promotion page set earlier, in the Thrive Ultimatum Lockdown settings:
Then, save everything and the automation should look like this:
The last step to be taken in Drip is to make sure that the workflow is active, by clicking on the “Start Workflow” button from the top right side of the screen:

Create the necessary settings on your site
As the “Start Trigger” set in this example is a tag added when someone subscribes to my site, I will now have to access my site again and open the page/post where the form is placed, where we want the subscribers to sign up.
Launch the Thrive Architect editor for that post/page:
Then, add a “Lead Generation” element to the page/post, if you have not already added one.
Next. configure the element and add a connection to Drip. Optionally, you can also add the “Email Connection”, so that you will get notified each time someone fills in the form.
Connect the element to Drip
In order to connect the element to your Drip account, you will first have to access the API dashboard and configure the settings from there.
This article is a step-by-step tutorial on how to create this connection (including how to set up the “Lead Generation” element).
Here is how to set up the connection for this form:
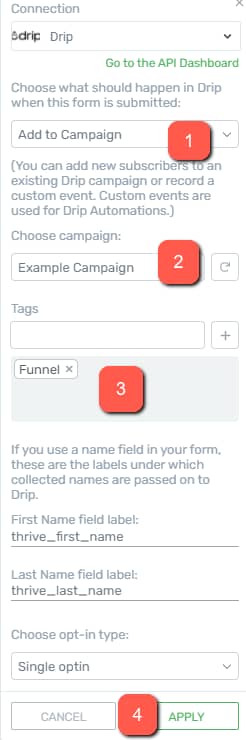
1: Choose “Drip” from the dropdown with all the connections;
2: Choose the campaign in which the new subscribers should be added;3: Add the tag that you’ve also added as a “Start Trigger” for the Drip Workflow;
4: Click on “Apply”.
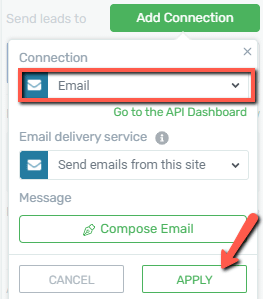
Create an “Email” connection
Optionally, you can also create an “Email” connection here, so that you get notified each time someone submits a form:
And that’s it! The setup is now complete. The new subscribers will receive a series of emails, but the Thrive Ultimatum campaign will only start if the subscribers open the second email.
Here is the workflow we’ve created in the example above, from a subscriber’s point of view:
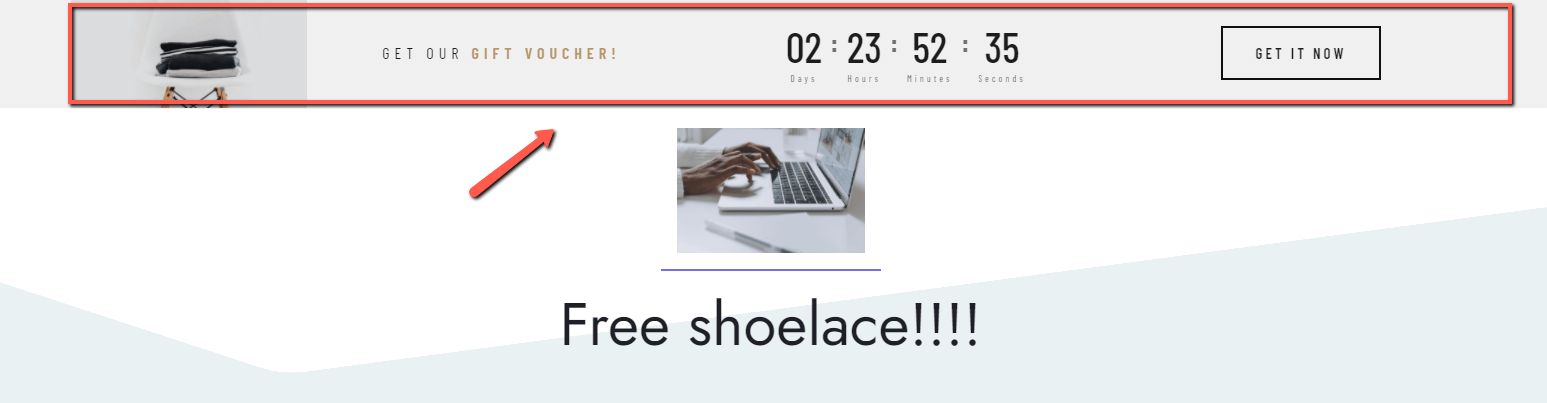
The last email contains the link to the promotion page. When opened, the Thrive Ultimatum campaign will also let the subscribers know the time they have left to use their offer:
This is how you can set up the “Incoming Webhook” for a Thrive Ultimatum Evergreen Campaign, using Drip. Please remember that this article contains just one example out of the many situations in which you can use this option.